Suppose you've selected nodes with varying memory and CPU specifications to run your application or cronjob. You aim to restrict these pods or the cronjob from being scheduled on any other node.
How would you assign this application or cronjob to those specific nodes?
To address this issue, several options are available for resolution.
Suppose you have three nodes: A, B, and C, and you aim to deploy an application named 'myapp' specifically on node A. To achieve this, you can take the following steps:
Taint the node
For instance, taint node A with a taint named 'red' using the command:
kubectl taint node n1 app=red:NoSchedule
Upon applying the taint, the scheduler attempts to schedule the 'myapp' pod on node A but encounters an issue. As a result, it attempts to schedule the pod on node B, where it successfully gets scheduled. This outcome occurs because the 'myapp' pod does not possess the necessary toleration to be scheduled on node A.
The 'kubectl taint node' command structure is as follows:
kubectl taint node <node-name> <key>=<value>:<taint-effect>
kubectl taint node n1 app=red:NoSchedule
Here:
- <taint-effect> determines the behaviour for pods that lack toleration, indicating what happens to such pods.
There exist three types of <taint-effect>:
NoSchedule: Prevents pod scheduling on the node.
PreferNoSchedule: Prefers not to schedule pods on the node.
NoExecute: Prevents scheduling of new pods and removes existing pods lacking toleration.
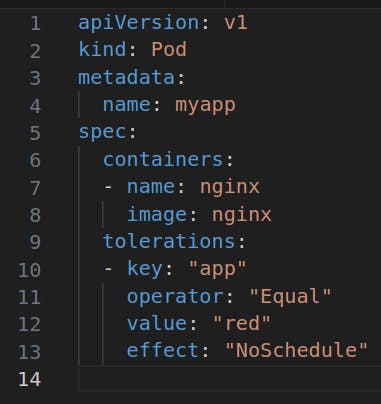
Now, after applying the taint to the node, let's proceed to apply toleration to the pods.

In the YAML provided above, ensure to use the same taint effect as demonstrated earlier for tainting the node.
Regarding NoExecute, this taint effect has a specific behaviour: suppose there are two pods running on node A. After applying a taint to node A with the NoExecute effect, any pod lacking toleration for this taint will be removed or evicted, while pods with the appropriate toleration will remain unaffected.
To clarify, while taints and toleration offer control over pod scheduling, having toleration for a specific node doesn't guarantee a pod will always be scheduled on that node. This unpredictability can be addressed by employing Node Affinity, another solution to restrict pod placement to specific nodes.
Node Affinity
How to Work with Node Affinity?
Label the Node.
In our case, we labelled a specific node using the command:
kubectl label nodes <node-name> <label-key>=<label-value>
kubectl label nodes n1 app=red
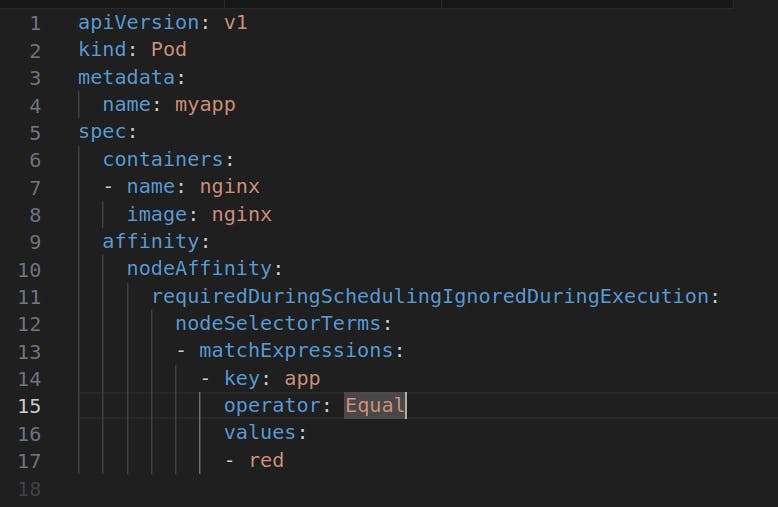
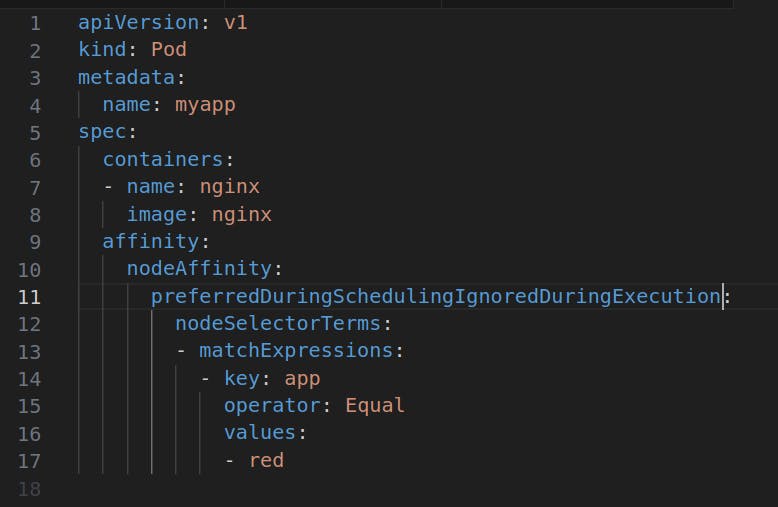
Use the Node Affinity in the pod.


Node Affinity can be somewhat intricate, involving two primary types of affinity that you can incorporate:
requiredDuringSchedulingIgnoredDuringExecution
preferredDuringSchedulingIgnoredDuringExecution
Let's delve into understanding these two types:
requiredDuringScheduling: This indicates that the rules should be adhered to during scheduling, ensuring specific node selection criteria are met. The 'IgnoredDuringExecution' aspect implies that any changes made to the node label after pod scheduling won't affect the previously scheduled pods.
preferredDuringScheduling: This signifies a preference to schedule pods on the designated node. Similar to the first type, 'IgnoredDuringExecution' denotes that any alterations in the node label won't impact the pods already scheduled on that node.
